Rust-Oleum Projects
Proudly Painted Pendants
Browse Projects
-
Design Your Own Denim
-
DIY Personalized Apron

-
Tools & Supplies:
-
Card Stock
-
Diamond Glaze
-
Double Sided Tape
-
Exacto Knife
-
Fast Finish Decoupage
-
Fine Paintbrush
-
Glass Tile and Bail
-
JewelTac
-
Orange Glitter
-
Repositionable Stencil Spray Adhesive
-
Sea Sponge
-
Small Greenery
-
Small Stencil
-
String
-
Tape
-
Instructions:
There are many techniques for painting glass tile pendants to create beautiful jewelry. The thing to remember about painting on the back of glass is, you are working backwards. The first color you apply to the glass will be in the forefront of your finished product.
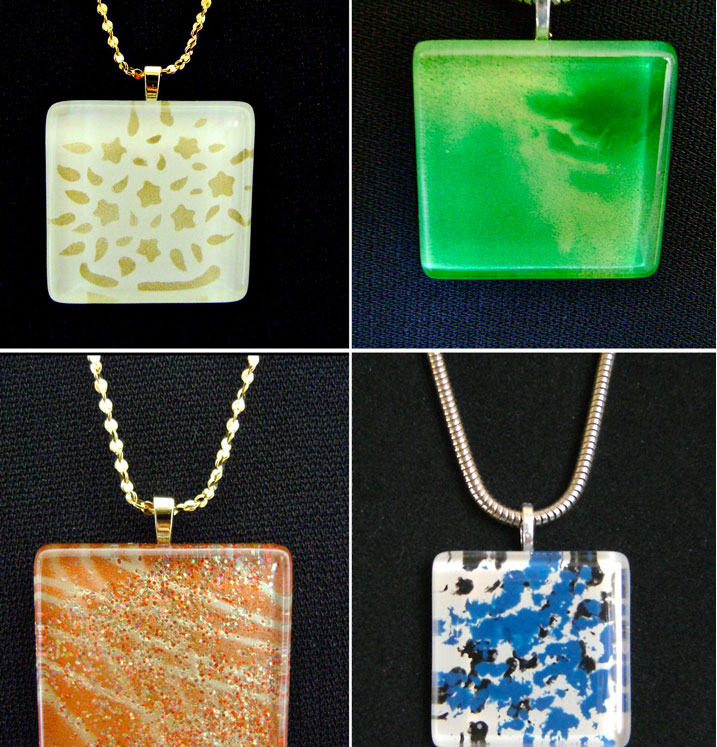
The pendants on this page are all created using the same steps once the painting is done but each uses a different technique for applying the paint. You’ll find four techniques described below.
No matter which technique you use, if you don't like what you're creating at any point, you can start over by dropping the glass into a bowl of hot soapy tap water. Allow the tile to sit in the water for about a half hour. The paint will slide off the glass leaving you with a clean tile to begin again. To remove small amounts of accidental paint spray, rub it with a Q-tip dipped in Testors Acrylic Cleaner.
SEALING
After the tile is painted and dry, apply Diamond Glaze to seal the paint and create a smooth shiny finish on the backside. Apply directly from the container’s applicator by squeezing a thin bead onto the edge of the tile. The bead will help contain the glaze as you fill in the center.
The glaze contains properties that cause it to spread and connect smoothly with the bead on the edges. The liquid will not spill over the sides unless you overfill the center area. Occasionally, bubbles will appear in the glaze, often a result of squeezing the container and pushing air out along with the glaze. Letting the glaze ooze out naturally by tilting the container can minimize bubbles. To remove bubbles, poke them with a pin or drag them to the edge of the glass. Although the glaze looks milky white at first, as it dries, it becomes clear and smooth.
ATTACHING THE BAIL
When the glaze is set, center a bail on the tile and attach it using Jewel-Tac.
TECHNIQUE 1 - STENCILING
What You’ll Need:
Gold paint
White Paint
Small stencil
Aztec airbrush tool
Glass tile & bail
Diamond Glaze
Jewel-Tac
This gold and white pendant was created with a stencil. You’ll find small stencils in many designs, which are made for painting birdhouses, etc. You don’t have to use an entire stencil. The one in this example only uses the top section of a flower pot stencil.
- If the stencil does not have an adhesive back, spray it with Repositionable Stencil Spray.
- Position a portion of the stencil on the glass and spray with gold paint. When dry, carefully remove the stencil.
- Spray the entire surface with white paint.
TECHNIQUE 2 - RESIST
What You’ll Need:
Yellow paint
Green Paint
Small greenery
Aztec airbrush tool
Glass tile & bail
Diamond Glaze
Jewel-Tac
The difference between resist and stenciling is, resist masks an image area from receiving a particular paint color while stenciling leaves the image area open. In this case green paint is applied to the entire tile except for small area masked by a piece of live greenery.
- Find your resist material from a tree or bush.
- Lay the greenery on the glass and hold it down with one hand while you spray the tile with green paint. The greenery may move around or lift a bit when you spray but this will create an interesting diffused image rather than the clear cut edges created by a stencil.
- When the green paint is dry, remove the greenery.
- Spray the entire surface with yellow.
TECHNIQUE 3 – STRING ART
What You’ll Need:
Gold Paint
Burnt Sienna Paint
Card stock
Double-sided tape
String
Scotch tape
Craft knife
Fine paintbrush
Orange glitter
Aztec airbrush tool
Glass tile & bail
Diamond Glaze
Jewel-Tac
Fast Finish Decoupage
- Unlike the abstract effects of masking, string art allows you to dictate an exact design by placing string across card stock.
- Fold a page of 8.5” x 11” card stock in half like you’re creating a greeting card.
- Trace the glass tile with the front side down on the card. Using a craft knife cut the square in the front panel.
- Drag a fine brush dipped in Fast Finish Decoupage across the backside of the tile. Immediately sprinkle orange glitter on the surface and let dry. Shake off any glitter that did not adhere. Work quickly as Fast Finish dries super fast.
- Tape a piece of string onto the cardstock. Bring the string across the window and tape it down.
- Continue bringing the string back and forth across the window and taping it down at random angles until you’re happy with the pattern you’ve created.
- On the opposite side of the front panel, put down four pieces of double-sided tape an inch away from the window frame.
- Slip the glass tile inside the “card” and press down the double-sided tape so the backside of the tile is facing up under the window.
- Spray the glass with Burnt Sienna.
- When dry, remove the glass and spray the entire surface with Gold paint.
TECHNIQUE 4 – SPONGE PAINTING
What You’ll Need:
Black paint
Blue Angel paint
Peach paint
Sea sponge
Aztec airbrush tool
Glass tile & bail
Diamond Glaze
Jewel-Tac
With this technique, three colors are added to the glass and the Peach paint serves as the background color.
- Pour the paint into a siphon bottle for your airbrush.
- Cut two small pieces of sea sponge to work with. Pour the blue and black paint into small separate containers.
- Dip a sponge into the blue paint. Dab it on a paper towel to avoid getting puddles of paint on the glass. Dab the sponge lightly over the backside of the tile. Don’t fill the space. Leave open areas for the other two colors.
- When the blue paint is dry, dip the sponge into the black paint and dab it over the glass. Let dry completely.
- Airbrush the Peach paint over the entire surface.
“Designed and Created for Testors by Domestic-Divaonline.com