Rust-Oleum Projects
Holly Jolly and Personalized Stockings
Browse Projects
-
DIY Christmas Home Décor
-
Aztek Airbrushed DIY Holiday Gifts

-
Tools & Supplies:
-
Camera
-
Circle Stickers
-
Drop Cloths
-
Exacto Knife
-
Glue Sticks
-
Hot Glue Gun
-
Painter's tape
-
Pencil
-
Ribbon
-
Scrap Paper
-
Scissors
-
Side Profile Photo Printed on Photo Paper Sized to Fit on Wood Plaque
-
Small Santa Hat
-
Straight Pins
-
White All Purpose Thread
-
White No-Sew Velcro
-
White Canvas Cloth 1yd
-
Wooden Oval Plaque 5x7 Inches
-
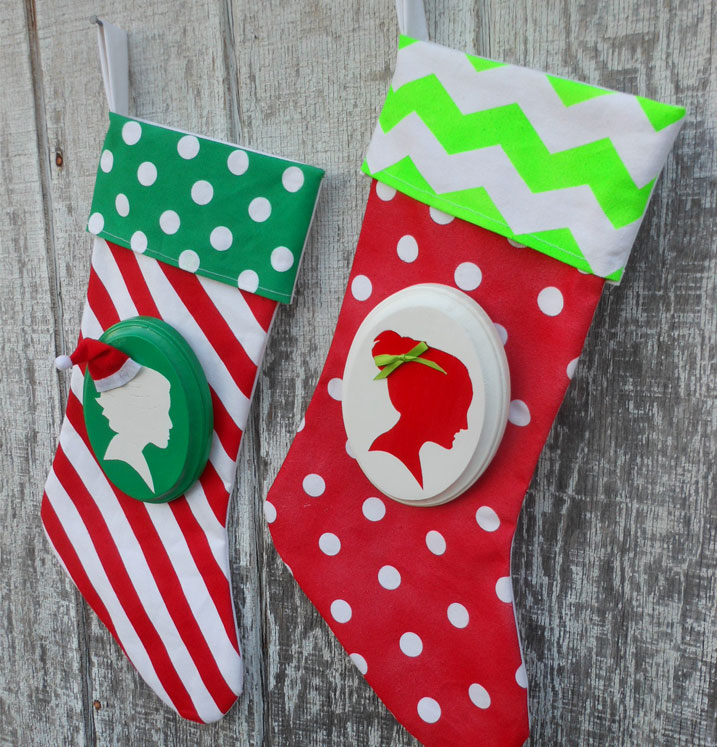
These personalized, keepsake stockings will not only fill your home with HOLIDAY CHEER, but will grace your walls ALL YEAR!
Instructions:
- For pattern, freehand draw stocking shape onto scrap paper, allowing additional 4”-5” at top of stocking to be folded down for cuff. (note: An existing stocking can be used as pattern.) Cut two stockings from canvas cloth.
- To create chevron design, fold down approximately 4”-5” of top layer of canvas cloth to create a cuff. (note: Do not sew cuff into place.) Cut 2” pieces of painters tape and adhere to cuff of stocking in zig-zag design. To create polka dot design, place circle stickers on front side of stocking in desired pattern just below cuff.
- Cover work area with a Testors Drop Cloth. Follow manufacturer’s instructions to assemble airbrush to your chosen air source.
- Practice airbrushing on piece of paper. Lightly press trigger and spray smooth, even strokes of Opaque Red paint on stocking, covering all circle stickers. Let dry and apply additional coats if necessary.
- If airbrush is left idle and paint has dried inside bottle, cap, or siphon tubes, disassemble parts and soak in Universal Acrylic Airbrush Cleaner.
- To change colors, pop off first bottle and thread connector onto another; snap into place. Replace red plastic cap on first bottle to keep paint fresh. Cover polka dot stocking to protect it from overspray. Airbrush Fluorescent Green paint over painter’s tape on cuff to create chevron design. Let dry and apply additional coats if necessary.
- Remove circle stickers and tape to reveal designs.
- Airbrush wooden plaque with Opaque White paint. Let dry and apply additional coats if necessary.
- Print photo of your subject’s side profile on photo paper. To create stencil, cut out silhouette with craft knife as shown. Follow manufacturer’s instructions for spray adhesive’s temporary bond application and adhere silhouette stencil to painted white plaque. Use painters tape to mask off exposed areas on plaque from overspray. Airbrush Opaque Red paint over stencil. Let dry and gently remove stencil.
- Pin both stocking pieces together with wrong sides facing out. Machine-sew stocking together, making sure to leave top of stocking open. Trim off any excess seam allowance. Turn stocking right side out. Fold cuff down. Using canvas scrap, create loop and machine-sew inside cuff. Sew over seam several times.
- Using hot glue, adhere Velcro in a cross formation to stocking back (hook side) and plaque back (loop side) as shown. To make removable plaque hanger, cut 4” ribbon length to create loop; secure with hot glue. Cut small piece of hook side of Velcro and adhere onto base of the ribbon loop as shown.
- Tie small ribbon length into bow and adhere to girl silhouette as shown. Adhere Santa hat to boy silhouette. Or, embellish plaques as desired. (note: If you would like to hang plaque year round, do not permanently adhere Santa hat.)
POLKA-DOT/STRIPE STOCKING
To create the Polka-Dot/Stripe Stocking, repeat steps for Chevron/Polka-Dot Stocking with the following changes. Adhere painter’s tape diagonally across stocking below cuff, then place circle stickers on cuff. Airbrush cuff green and below cuff red. Airbrush plaque green and silhouette white. All other directions are the same.
Tip:
Using Velcro allows you to remove the silhouette plaque and hang in your home throughout the rest of the year. And as your child grows, you can recreate and attach a new silhouette. Color schemes can be adapted to match your décor.
“Designed and Created for Testors by Domestic-Divaonline.com