Rust-Oleum Projects
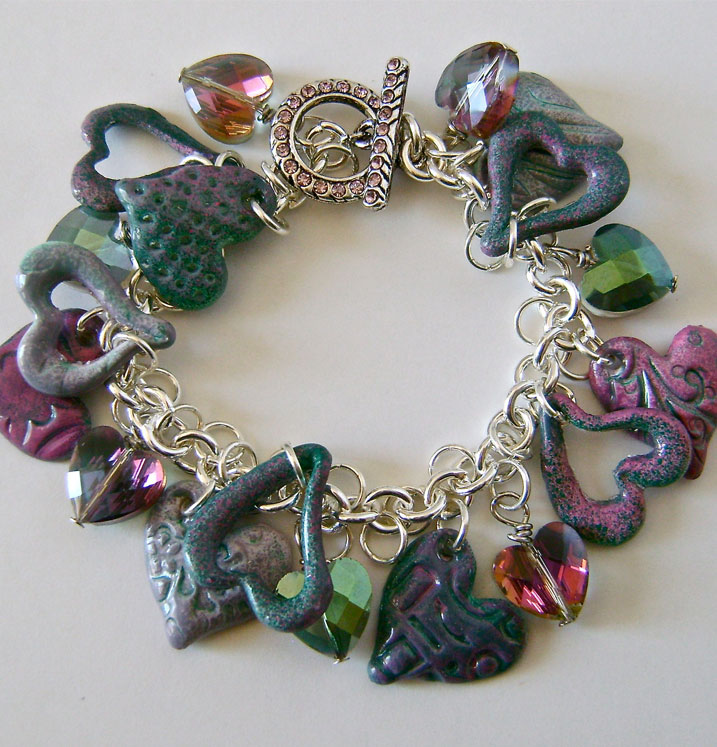
Charms from the Heart
Browse Projects
-
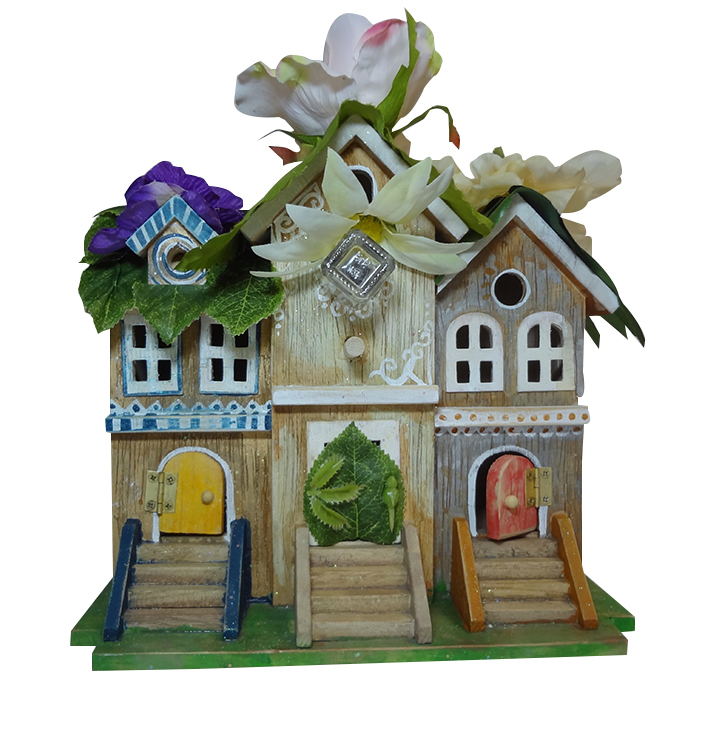
Fairy Condo Bird House
-
Aztek Airbrushed DIY Holiday Gifts
-
Tools & Supplies:
-
Acrylic Roller
-
Ball Point Pen
-
Bead Gallery Crystal Hearts
-
Bead Gallery Beads
-
Bracelet Chain With Jump Rings
-
Clay Conditioning Machine
-
Clay Texture Sheets And Or Texture Wheel
-
Diamond Glaze
-
Large And Mini Heart Cutter
-
Nail Head Wires
-
Paint Brush
-
Painter's tape
-
Paper Clips
-
Plastic Wrap
-
Rhinestone Toggle Clasp
-
White Premo Sculpey Clay
-
Instructions:
- Condition 2 oz. of clay with a roller or clay conditioning machine. Press the clay out to a uniform sheet approximately 1/16” thick on a glass or wax paper surface.
- A) There are many texture sheets and texture wheels you can use to make impressions on your clay. See the collections at Amazon or craft stores. The creator of this project used both wheels and sheets and rolled across the sheets with an acrylic roller to create a series of designs in the clay. B) Create a variety from which you can later choose.
- Place kitchen plastic wrap over the clay sheet and press the heart clay cutter down over the designs to capture details that appeal to you. The plastic wrap will create nice rounded edges. There is no worry of mistakes here. If you don’t like what you’ve done just roll the clay together and start over.
- Lift the clay sheet leaving the heart shapes on the work surface. Roll the sheet together, flatten and cut out more hearts if necessary. Cut the heart frames using a mini heart cutter centered inside the hearts you just made. Don’t forget to put down the plastic wrap.
- Lift the clay sheet leaving the heart shapes on the work surface. Roll the sheet together, flatten and cut out more hearts if necessary. Cut the heart frames using a mini heart cutter centered inside the hearts you just made. Don’t forget to put down the plastic wrap.
- Here’s another tip using an old ballpoint pen. Put the tip of the Etch ‘n Pearl tool into the front surface of the clay. On the back side line up the hole of the ball point pen then gently twist the tool through the clay and into the pen hole. This creates an extremely clean hole on both the front and the back side of the heart.
- Create more interesting shape for the heart by pinching the bottom points and curving them to one side. Bake the hearts on a foil lined flat pan in the oven for 30 minutes at 275 degrees. Allow to cool completely before painting.
- To create muted tones in the pink and green paint, use a pipette (paint eye dropper) to add a few drops of green to the pink, and a few drops pink to the green. Add red to either of the blended colors to create the pale mauve color.
- Fill paint cups with the three colors. Airbrush 1/3 of the hearts on both sides with the green blend, 1/3 with the pink blend and 1/3 with the mauve color. When the paint is dry, very lightly dust the green hearts with pink.
- Create contrasts to bring out the small details in the surface of the pink and mauve hearts. In a small container, water down a little of the green color. Use a small brush to apply it across the hearts being sure it seeps into the impressions. Immediately dab at the paint with a rag to remove most of the wet paint leaving color in the impressions.
- Create small hangers for the hearts and frames with paper clips. Dip each heart in a small container of Diamond Glaze. Tap off excess and hang the pieces to dry on a wood pick. Protect the surface beneath. After about a half hour you’ll see a bubble of glaze hanging off each piece. Remove it by running your finger smoothly against it. Allow the pieces to dry over night.
- Remove the wires from the dried pieces by gently twisting with a screwing motion. If some paint should peel off, touch it up with a small brush. Use the Etch ‘n Pearl tool to open the holes in the hearts if the glaze had closed them. Use a twisting motion.
- Insert a nailhead wire into seven of the crystal hearts, making a wrapped loop. If you aren’t familiar with how to make wrapped loops go to Jewelry Making Techniques and Tools.
- Cut the chain to measure 6.75”. Attach each half of the clasp to the ends.
- Attach the seven crystal hearts to a jump ring on the chain leaving approximately .75” between each.
- Attach jump rings to six clay hearts and five heart frames. Attach the hearts to the chain between the crystal hearts. Attach the heart frames spaced evenly across the chain.
“Designed and Created for Testors by Domestic-Divaonline.com