Rust-Oleum Projects
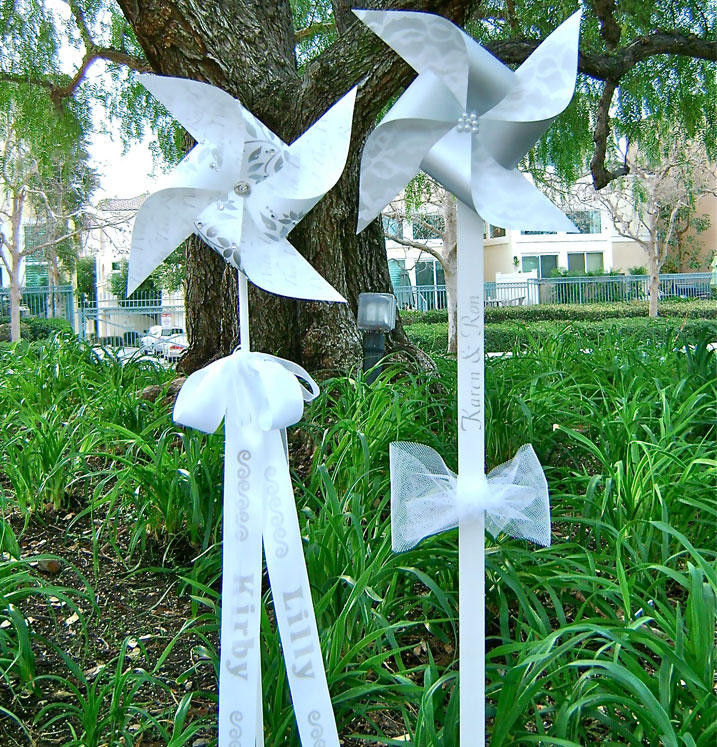
Love is in the Air Pinwheels
Browse Projects
-
DIY Summer Napkin Ring
-
Teal Pumpkin
-
Tools & Supplies:
-
Balsa Wood Stick
-
Card Stock
-
Floral Stencil
-
Lace Fabric
-
Nail Head Wires
-
Netting
-
Pearls
-
Plastic Tube Or Straw
-
Repositionable Stencil Spray Adhesive
-
Rhinestone Button
-
Rhinestones
-
Round Nose Pliers
-
Scissors
-
Tac Glue
-
Thick Needle
-
Water Bottle Cap
-
White Satin Ribbon
-
Wood Dowel
-
Instructions:
Create Pinwheel Template
- Make a template for the pinwheel by cutting out paper to measure 8.5” square.
- Draw diagonal lines from corner to corner.
- Stick a thick needle into the point where the lines intersect.
- Make a mark 2” from the hole on each of the four lines.
- Using the Testors Hobby Knife, cut the lines to the mark.
- Stick the needle through the corner section of every other panel.
PINWHEEL #1
- Airbrush one side of a 8.5” square of cardstock with silver paint. Cover the entire surface.
- Spray one side of a 9” x 9” piece of lace fabric with repositionable adhesive. Attach it to the unpainted side of the cardstock. Spray with silver paint. When dry, remove the lace.
- Use the paper template to cut the four diagonal slits in the cardstock. Make a hole by pushing the needle through the template hole.
- Use the needle to make a hole in every other corner section of the square, using the template as your guide.Paint a 1” wide balsa stick white.
- From cardstock, cut out a circle or square to fit inside the bottle cap.
- Put a needle through the center of the cardstock to create a hole. Remove the needle and replace it with a 3” long nail head wire.
- Glue the cardstock into the bottle cap with the nail head against the cap, centered and vertical.
- Slip a ½” long piece of plastic tube or a piece of plastic straw over the wire. Slide it to the bottom and glue it to the cardstock.
- Guide the wire through the hole in the center backside of the pinwheel. (A blue pinwheel is used here for photo clarity).
- One by one, insert the wire into the corner hole in each panel.
- Place a pearl (or decorative bead) on the wire and grab the end with the round nose pliers.
- Push the panels down on the wire so they’re out of the way while you create a small loop in the wire end with the pliers.
- Glue the bottle cap to the stick. Glue several more pearls in the center of the pinwheel.
- On the painted stick, write the names of the wedding couple in silver with a marker or paintbrush, or create a stencil and airbrush the names.
- Tie a length of 1/3 yard of netting into a bow around the stick.
PINWHEEL #2
- Create a new 8.5” x ll” page in a design or text computer program. Choose light grey for your color and type in the words “With this ring I thee wed” in a large script font. The pinwheel pictured used Zapfino font. Fill the page, repeating the words and print it out on cardstock.
- Trim the page to a 8.5” square.
- Turn the square over and apply the stencil. Spray with silver paint.
- Use the paper template to cut the four diagonal slits in the cardstock. Make a center hole by pushing the needle through the template hole.
- Use the needle to make a whole in every other corner section of the square.
- Paint the wooden dowel white.
- From cardstock, cut out a circle or square to fit inside the bottle cap.
- Put a needle through the center of the cardstock to create a hole. Remove the needle and replace it with a 3” long nail head wire.
- Glue the cardstock into the bottle cap with the nail head against the cap, centered and vertical.
- Slip a ½” long piece of plastic tube or a piece of plastic straw over the wire. Slide it to the bottom and glue it to the cardstock.
- Guide the wire through the hole in the center backside of the pinwheel.
- One by one, insert the wire into the corner hole in each panel.
- Grab the end of the wire with the round nose pliers.
- Push the panels down so they’re out of the way while you create a small loop in the wire end with the pliers.
- Glue the bottle cap to the stick.
- Using wire cutters, remove the shank from the back of a fancy rhinestone button.
- Bend the loop in the center of the pinwheel to a 45 degree angle and glue the button to the wire loop.
- Glue rhinestones to the silver stenciled design.
- Write the names of the wedding couple in silver on a wide white ribbon with a marker or paint brush, or create a stencil and airbrush the names.
- Tie the ribbon into a bow on the stick.
“Designed and Created for Testors by Domestic-Divaonline.com